Update Item Records Version
Overview
The system maintains several types of records for items:
- Item record - Basic information about an item, such as description, item number, item class, UNSPSC code, commodity code, default vendor information, and more.
- Item Vendor record(s) - The vendor(s) for the item, the manufacturer and vendor item numbers, contracts that carry the item, price markup information, and so on.
- Item Vendor UOM record(s) - The units of measure (UOMs) for issuing and purchasing the item, and the price of each UOM. Each vendor that carries an item has an Item Vendor UOM record.
- Item Inventory record - Item records, item vendor records, and other data (such as on-hand quantity) specific to each asset location that inventories the item.
The following sections explain how to
access and edit item records.
Note: You can also use the Item Import feature to update item records. See Item Import and Mass Maintenance.
Security
The topic Restrict Users from Editing Asset Location Records and Item Inventory Records outlines how to access and use the Allow Changes to Asset Location and Inventory field.
If your user profile restricts you from displaying financial data, fields on any of the item inventory panels that normally display financial information (such as unit prices, average cost, inventory value) contain "{restricted data}."
See your system administrator if you
need to maintain information in the Item Inventory.
Item Catalog Records
Item catalog records are created with Consolidated Item Add. Some information on an Item record can be changed if needed. Clearly, the Item No is not a candidate for change, but fields such as Item Alias, Item Picture URL, Search Words, and others may be updated.
To update item catalog records:
- From the Materials Management main Contents, select Inventory > Item Catalog.
- The Item Catalog list appears.
- Use the Search and Quick Filter to
locate the item that you wish to edit.
- Click the pencil icon
 beside the item or select Menu > Edit.
- The Item Catalog Edit panel (Figure 1) appears.
Note: Depending on features enabled for your site, more details may appear on the Item Catalog Edit panel than those displayed in Figure 1.
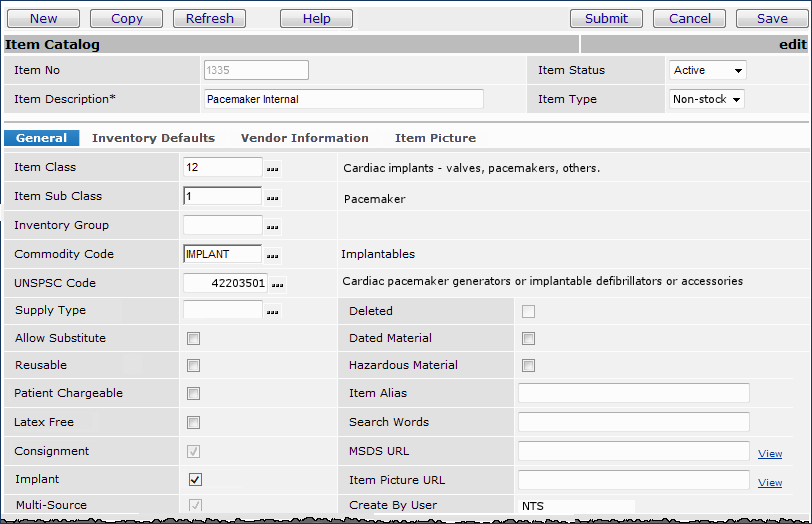
Figure 1 - Item Catalog Edit Panel
- Make any needed changes on the Item Catalog Edit General panel.
- Note that other tabbed panels of information exist:
- The Vendor Information panel displays vendor information, but you cannot edit
the information. The discussion
below describes how to edit vendor information.
- If you have specified an Item Picture URL on the General panel,
a picture appears on the Item Picture panel.
- Click Save periodically to save your work.
- Click Submit. The new information is saved in the item catalog record.
Changing Item Aliases and Search Words
- To change an Item Alias or Search words in the item catalog only, enter new values in the fields.
- To change an Item Alias or Search words in the item catalog and in item inventory records,
- Empty the current Item Alias or Search words fields in the inventory record(s).
-
Then, enter the changed item alias or search words in the item catalog record.
- The new values will populate the emptied Item Alias or Search words fields in the item's inventory records.
Important: Changes from the item catalog do not get copied to Item Inventory records unless you first empty the Item Alias and Search words fields in the inventory records.
Using Inventory Defaults
Organizations can define item catalog default values for the Patient Charge Number (CDM), Pass-Through Code, and Billable/Non-Billable Expense Codes (Figure 2) that can be automatically copied to any new inventory records created for the item. These fields are located on the Inventory Defaults tab. The automatic copy is enabled by organization on the organization record.
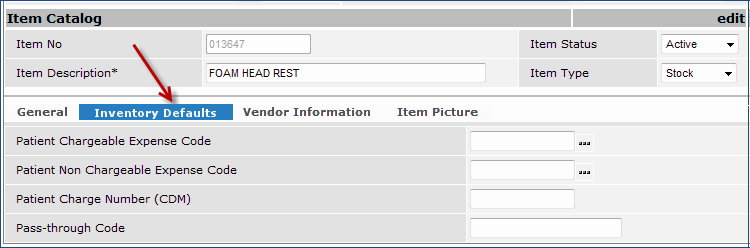
Figure 2 - New Inventory Default Fields on the Item Catalog Record
Fields on the Organization Edit panel -- when selected -- enable the automatic copy of the item catalog defaults to inventory records. The fields are located on the MM Information tab (Figure 3):
- Assign Patient Charge Number (CDM) from Catalog
- Assign Expense Codes from Catalog
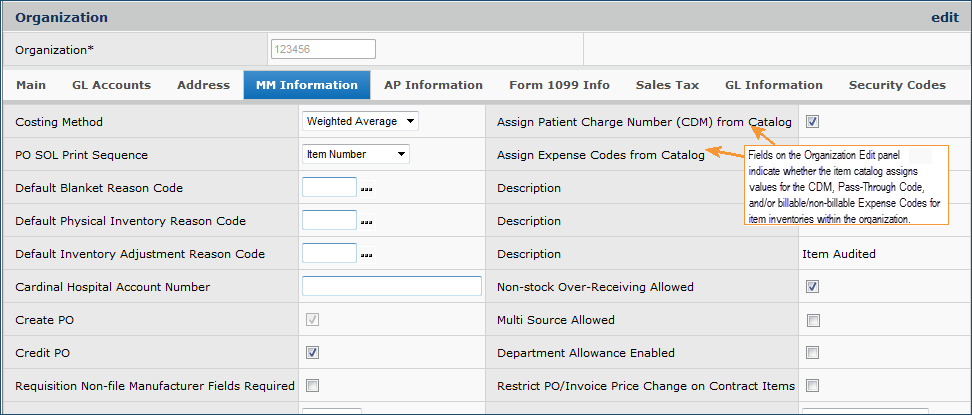
Figure 3 - The Organization Record Edit Panel
When an organization creates a new item, the defaults specified on the Consolidated Item Add panels are written to the inventory record. If an organization sets the Assign Patient Charge Number (CDM) from Catalog and Assign Expense Codes from Catalog fields, the default values for Patient Charge Number (CDM), Pass-Through Code, and Billable/Non-Billable Expense Code are retained on the item catalog record, and used to populate additional records for any future inventory assignments.
These actions also copy the default Patient Charge Number (CDM), Pass-Through Code, and Billable/Non-Billable Expense Code:
- Assigning a catalog item to an additional inventory. (See Inventory Records.)
- The Mass Item Assignment utility sets the item inventory record values to the organization's item catalog defaults.
- Creating new item records or changing existing records using the Excel Item Mass Maintenance worksheets.
(See Item Import and Mass Maintenance.)
- The Item Mass Maintenance download to Excel includes the item catalog’s Patient Charge Number (CDM), Pass-Through, and Expense Codes values. These fields are located on the Items worksheet.
When the automatic copy fields are selected on the organization's record,
- For new items, the item mass maintenance upload process uses the values on the Items worksheet to populate the corresponding item inventory record fields.
- For existing items, changing the values on the Items worksheet also changes the values in all existing item inventory records.
You can leave the default fields blank if you do not use them. If you change the values of the fields on the item catalog record, and the two "assign" flags on your organization record are set, all the organization's item inventory records are changed. You cannot change an existing value to a blank ("no value"). Changing the value of a field to blank (i.e., erasing the current value in the field) on the item catalog record has no effect on existing item inventory records; the original value is retained.
The Item Vendor Record and the Item Vendor UOM Record
When an item is created in the item catalog, UOM prices are established for the primary vendor. If you wish to purchase the item from an additional vendor, add the vendor and add a set of item UOM prices for the vendor. When you edit the Item Vendor UOM record, it
is important to change UOM prices in the correct order. Select Recalculate
All UOM Unit Prices on the Item Vendor record (Figure 3) to recalculate
all UOM prices based on a new price for the lowest UOM.
On contract items, if you change the Item Vendor UOM Purchase Price and the item is activated on a contract, an error message appears. The authorized user will need to review the price change and determine whether to accept or reject it.
To edit an existing item catalog vendor record or add a new item vendor record:
- From the Materials Management main Contents, select Inventory > Item Catalog.
The Item Catalog list appears.
- Use the Search and Quick Filter to
locate the item that you wish to edit.
- Next to the item, select Menu > Item Vendors.
The list of vendors for the item appears (Figure 4).
If the item is Incomplete (and no vendors have been assigned to the item), No Data appears.
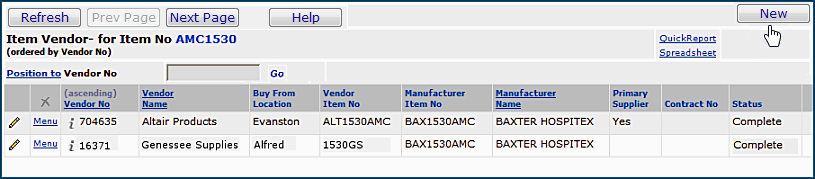
Figure 4 - Item Vendor List
- To edit an existing Item Vendor record, select Menu> Edit or click the pencil icon
 in the appropriate row. The Item Vendor record for an existing vendor contains both information for the vendor and information (at the bottom, on the Vendor UOMs tab) for item UOMs and prices.
Unless the item is multi-sourced, you can only change the Manufacturer Item Number, Vendor Item Number, recalculate flag, and unit of measure prices and conversion factors.
- To edit UOM prices:
- Change the Purchase Unit price of the lowest UOM for the item to the new
price.
When you save the record, if you have set Recalculate All UOM Unit Prices, all the prices change.
- Otherwise, if Recalculate All UOM Unit Prices is not set, you will need to change the other unit prices yourself.
Notes:
You cannot change a Unit of Measure value (e.g., you cannot change EA to BX), nor create a new lowest unit of measure. However, you can add an Alternate UOM. Click the Alternate UOMs tab. Then click New.
Two fields on the item inventory record may affect your ability to delete item vendor UOMs. The fields Preferred Order Factor and Preferred Order UOM on the item inventory record identify the minimum divisor (at the lowest UOM) for an ordered quantity. When values exist in these fields, the ordered quantity must be evenly divisible by the preferred order factor. If not evenly divisible, the quantity is rounded upwards to the next evenly divisible quantity.
If you change an item's UOM conversion factor on the item vendor record, and the UOM is also designated as a Preferred Order Factor for the item, a warning message appears. The message says that the UOM is used as a Preferred Order UOM. See the explanation of these fields for details.
Important: If the item is activated on a contract and you try to change the Purchase Price, you will receive an error message. If an item is activated on a contract, use Change Manufacturer or MIN for the same VINS.
- To create a new Item Vendor record, from the list of vendors for the item (Figure 4), click New.
An empty Item Vendor record panel (Figure 5) appears.
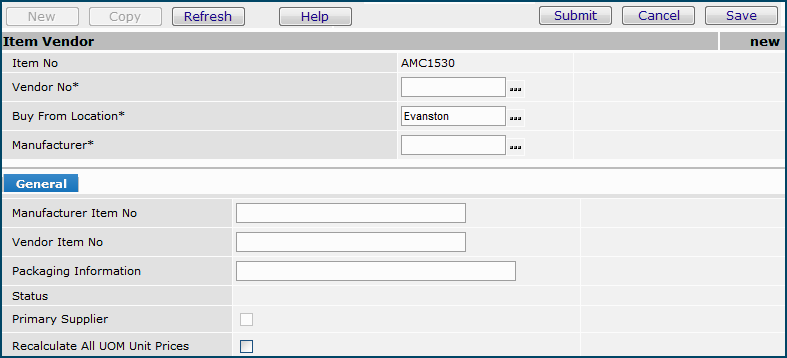
Figure 5 - Item Vendor Record Panel for a New Item Vendor
- Enter information in the fields on the as needed.
-
Click Help if you need field information.
- When you are finished adding or changing information, click Save and Submit.
The Item Vendor UOM panel appears (at the bottom of Item Vendor Edit) and contains No Data (Figure 6).
- Complete the Item Vendor UOM information at the bottom of the panel.
To add a UOM price:
- Click New.

Figure 6 - An Item Vendor Record Edit Panel with No UOM/Price Information
The Item Vendor UOM Edit panel appears (Figure 7).
- Enter UOM and price information for the lowest unit of measure. Complete other fields as needed.
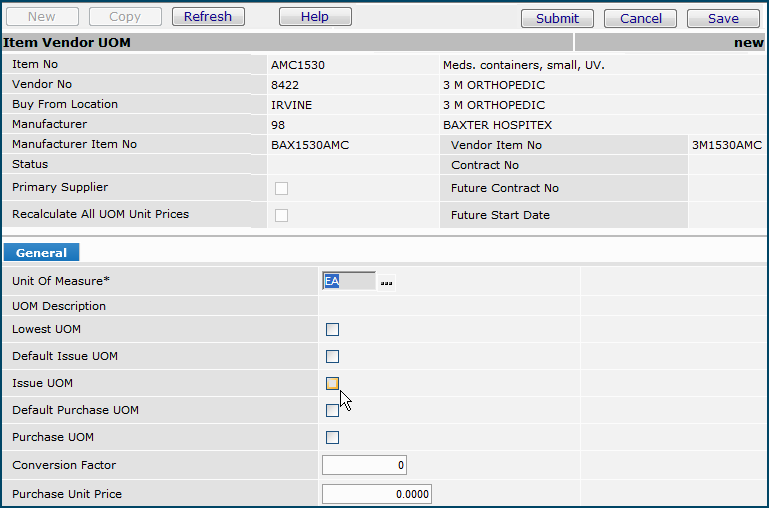
Figure 7 - Item Vendor UOM Edit Panel
- Click Save.
- Click Submit.
- You are returned to the Item Vendor Edit panel.
-
For new item UOM prices, click Refresh to view the UOM and price data that you just entered.
- To enter another price for a different UOM, click New and complete the Item Vendor UOM Edit panel again.
- Prices cannot be entered for UOMs when the Aero Cost Item flag has been selected on the Item Vendor Edit panel. (See Figure 6.)
- When you finish, click Save and Submit on the Item Vendor panel.
The list of item vendors is displayed.
Item Inventory Records
The system creates an Item Inventory record for the default asset location when you add an item using Consolidated Item Add. You can assign the item to other asset locations, as well. Unless the item is multi-sourced, all the asset locations will use the same vendor and price information for the item.
When you assign an item to an asset location with GL Account Validation turned on, the default billable expense code for the item must have a valid GL expense segment. That is, the expense segment associated with the code must map to an account. Otherwise, the item inventory record is incomplete, and you will not be able to order the item. See Using General Ledger Account Validation for details.
Security for Item Assignment and Maintenance
- The role object "Catalog" controls authority over item catalog maintenance. The minimal setting to be able to maintain item catalog records is Modify.
- The "CatalogAssign" role object governs permission to assign items to an asset location. The initial setting of the "CatalogAssign" role object is the same as the "Catalog" role object setting. The minimal setting to be able to assign items is Modify.
- Note: If you are assigning multiple items to asset locations, use Mass Item Assignment.
- For item inventory records, the Inventory role object (Maintain Item Inventory ) must have its security level set to View (or higher), and must be included in the
role that is assigned to your User ID. To be able to change Item Inventory information, the Inventory role object (Maintain Item Inventory ) must be set to Modify (or higher).
- In addition, to be able to edit Item Inventory information at a particular asset location, the field Allow Changes to Asset Location and Inventory on the Data Profile Asset Location panel must be selected. This field controls permission to edit asset location records and edit item inventory records at the asset location. This field also controls permission for the following functions that you can perform for an inventory item:
- Department Backorders
- Item Vendor(s)
- Adjust Inventory
- Reset Mixed UOM Conversion
- Set Multi-Source
- Set Single Source
- Override Default UOMs for Primary Supplier (new)
- Delete
- Lot Tracking
- Edit
- The functions are available from the Menu next to any item on the Item Inventory list.
- The topic Restrict Users from Editing Asset Location Records and Item Inventory Records outlines how to access and use the Allow Changes to Asset Location and Inventory field.
- See your system administrator if you
need to maintain information in the Item Inventory.
To assign an item to a single asset location:
- From the Materials Management main Contents, select Inventory > Item Catalog.
- The Item Catalog list appears.
- Use the Search and Quick Filter to
locate the item that you wish to assign to an asset location.
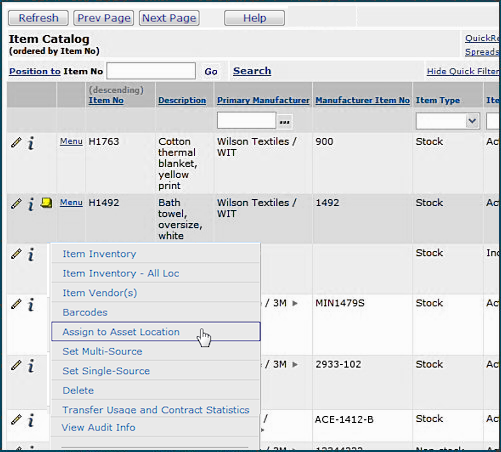
- Next to the item, select Menu > Assign to Asset Location (Figure 8).
Figure 8 - The Item Catalog Menu for An Item: Selecting Assign to Asset Location
- A list of asset locations is displayed (Figure 9).
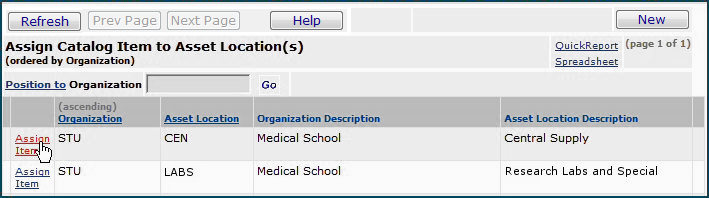
Figure 9 - Asset Locations for Item Assignment
- Next to the asset location that you wish to assign the item to, click Assign Item.
- A message is displayed, asking you to verify the assignment (Figure 10).
- If the item catalog contains a Note for the item, select Copy Notes? to copy the note to the Item Inventory record in the asset location.
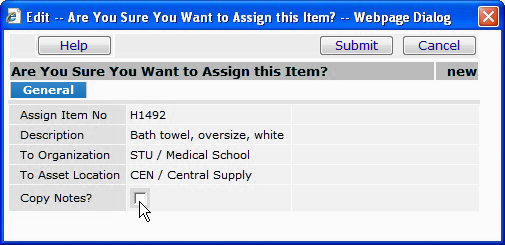
Figure 10 - Confirming an Item's Assignment to an Asset Location
- Click Submit.
- The item is assigned and a new Item Inventory record is created.
To edit an item inventory record from the Item Catalog list:
- From the Materials Management main Contents, select Inventory > Item Catalog.
- The Item Catalog list appears.
- Use the Search and Quick Filter to
locate the item.
- Select Menu > Item Inventory to display the Item Inventory record for the default asset location
- Or, Menu > Item Inventory - All Loc to view all asset locations for the item, and select the record to edit.
- Click the pencil icon or Menu > Edit next to the record.
- The Item Inventory Edit panel appears.
- Edit fields on the panel as needed.
- Click Save and Submit when you are finished.
Note: If you access the item inventory from the Item Catalog list, unless the item is multi-sourced, you cannot edit the item's vendor prices.
Editing Item Vendor Records for Multi-Sourced Items - Security
Security administrators need to be able to prevent inventory users from editing any multi-sourced item vendor record.
A role object "Item Vendor Multi-Sourced" is available for this security need. Editing multi-sourced vendor item records is now governed by the role object. The initial setting of this new role object is the same as the role's setting for the "Inventory" role object. Setting the new "Item Vendor Multi-Sourced" role object to View or None will prevent users with the associated role from editing multi-sourced items.
To display/edit multi-sourced items for a vendor
- From the Materials Management main contents, select Inventory > Item Inventory or Item Inventory - All Locations. The Item Inventory list appears.
- Click Search (Figure 11).
- On the Search panel, select Multi-Source.
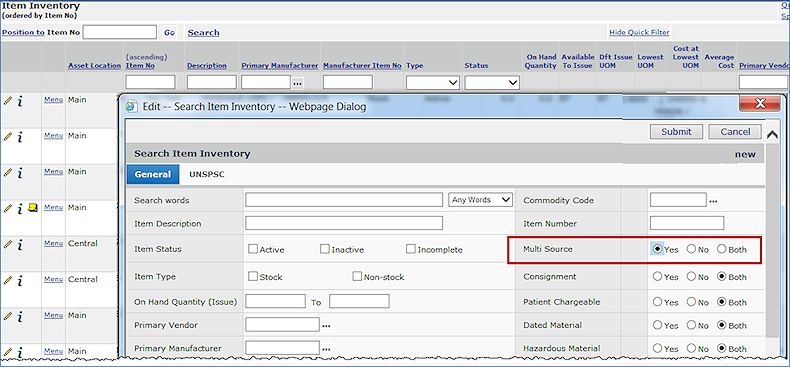
Figure 11 - Searching for Multi-Source Items in the Item Inventory List
- Click Submit. The Item Inventory list is filtered for multi-sourced items only.
- Next to the item of interest, select Menu > Item Vendors (Figure 12).

Figure 12 - Accessing Item Vendor Records from the Inventory List
- Locate the item in list and click Menu.
If the "Item Vendor Multi-Sourced" role object is set to Modify, Create, or All for your role, the Edit menu element is active, and you can edit the item. Otherwise, neither the edit icon nor the Edit element is available, and the user cannot edit the item vendor record from this list. In Figure 13, the user has the role object set to View, for example, and cannot edit the item. No edit element exists on the item menu, and no edit icon is present.
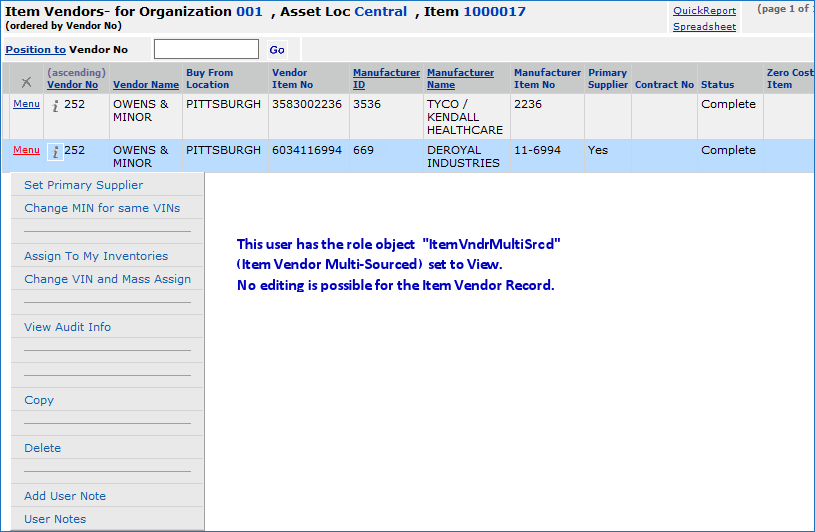
Figure 13 - Item Vendor Records List for a Multi-Sourced Item
Mass Assignment of Items to Asset Locations
Once you have created asset locations,
you can use Mass Item Assignment to identify and copy item information records
to the asset locations. You can also assign an item to be sourced from other asset locations besides the Default Supplying Asset Location.
Mass Item Assignment has two parts:
- Item record and asset location definition. This step identifies:
- The items whose item information you
want to copy.
- You can select items using multiple selection criteria; for example, all items
of a certain Item Class, from a given Vendor, with a Minimum Stock Quantity
value.
- Other selection criteria are available, such as selection by the UNSPSC codes assigned to items (if used at your site).
- You can also select items
by individual Item Number, if you wish.
- The asset location whose item inventory
records you are copying.
- You can override values of fields in the inventory records for items if you
wish, and assign the item new values when it is copied.
- The asset location that gets the copied
item records.
- Item record copying.
This step performs the copy. You can make the copy of the item records immediately,
or schedule the copy process to run as a batch job.
To use the Mass Item Assignment feature:
- From the Materials Management main Contents, select Inventory > Mass
Item Assignment.
- Click New to select items for mass assignment.
- The Mass Item Assignment panel appears (Figure 14).
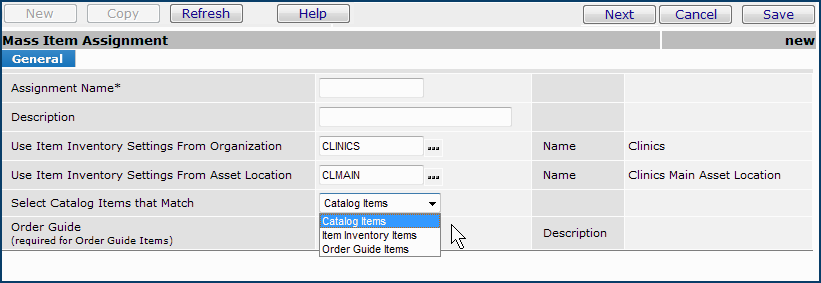
Figure 14 - Mass Item Assignment Setup Panel
- Complete the fields on the panel.
- Provide an Assignment Name and Description for the mass item assignment.
- The field Select Catalog Items that Match has three options:
- Catalog Items lets you select items to assign from the complete item catalog.
- Item Inventory Items restricts the list of available item catalog items to only those found in the item inventory for the organization and asset location specified in the fields Use Item Inventory Settings from Organization and Use Item Inventory Settings from Asset Location. Only non-deleted, active items are available for selection.
- Order Guide Items lets you restrict the list of available items for assignment to those in a specified order guide.
- When you use this option,
you must also select the order guide.
- Click the prompt in the Order Guide field. The Order Guide prompt only shows order guides that are valid for the user's data profile departments.
- Only non-deleted, active inventory items from the order guide's supplying organization and asset location are available for selection.
- As you complete information on a panel, click Next to move to each
successive panel.
- Click Help for information on panels' fields.
- When you are finished defining items, click Finish Now to copy the
item information to the asset location's inventory records.
- Click Finish Later to copy
the item information later. You can then schedule
the job to run at another time.
User-Initiated Changes to Contract Item Prices
Occasionally, a price for a purchase order item may need to be changed. You can edit a purchase order line, and enter the Next Estimated Receipt Cost so that when the receipt is created, the cost will be correct, and will match the invoice. On an exception invoice, clearing a price exception could similarly require accepting a price change for an item on the invoice.
For non-contract items, the system has no problem updating the Item Vendor UOM Record price when you clear an invoice price exception, enter a new price on a purchase order, enter a new price for the next PO receipt, or work with an EDI 832 or 855 document. You can also edit Item Vendor records directly and change prices. Figure 15 shows an invoice exception being cleared. The user has instructed the system to also change the price on the Item Vendor UOM record.
For contract items, however, a user-initiated change to the price on an Item Vendor UOM Record has special considerations, and follows a different process. For contract items, you can enter the Next Estimated Receipt Price on a purchase order. Similarly, in clearing invoice price exceptions, you may change an item's price on the invoice. Such price changes do not affect the established contract price recorded in the Item Vendor UOM record, unless you explicitly tell the system to change the Item Vendor UOM record.
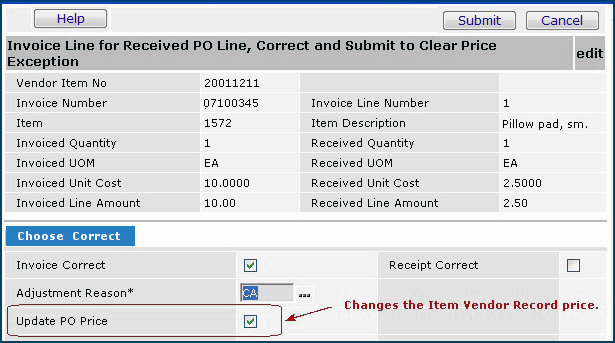
Figure 15 - Clearing an Invoice Price Exception, and Writing the New Price to the Item Vendor Record
For contract items, when you change an Item Vendor Record price -- either directly, or from a purchase order, EDI 855 document, EDI 832 Vendor catalog, or while clearing an invoice -- the application displays a message. You then have the option of continuing with the price change, or not changing the price.
Price Changes in Multi-Sourced Items: Copying New Prices to Other Asset Locations
When a multi-sourced item has a manual price change, you can automatically copy the new price to the item's vendor records in other asset locations.
The item records in the other asset locations must contain the same item number, vendor, VIN, and UOM as the item record with the original price change. The item must also be multi-sourced in the other asset locations.
This feature applies to item prices that are changed by...
- Editing the item vendor record Unit Cost.
- Clearing a price discrepancy resulting from a new price on an EDI 855 vendor confirmation.
- Clearing an invoice price exception as "invoice correct" and "update PO line."
- Editing the Next Estimated Receipt Unit Cost on an authorized purchase order line.
- Editing the Unit Cost on an unauthorized purchase order line. The field Update Vendor Cost on the PO line must be checked.
When you change an item price in any of these ways, if item vendor records with the same vendor, VIN, and UOM exist in other asset locations for the item, the application displays a panel for updating them with the new price. (The list of asset locations for selection is restricted by the user's data profile.)
If no other matching item vendor records exist in other asset locations, or the item is not multi-sourced in other locations, the panel does not appear.
Example
For example, Figure 16 displays an unauthorized purchase order line. The user is in the process of changing the Unit Cost from $1.25 to $1.27.
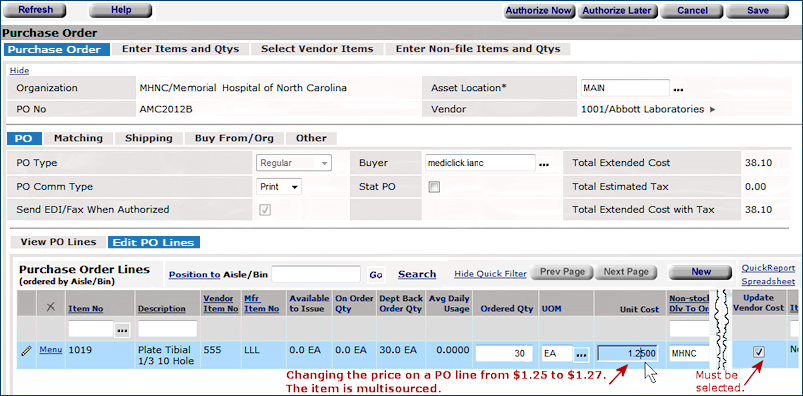
Figure 16 - Changing the Unit Cost on an Unauthorized PO Line
Clicking Enter displays the Mass Item-Vendor Price Change panel (Figure 17).
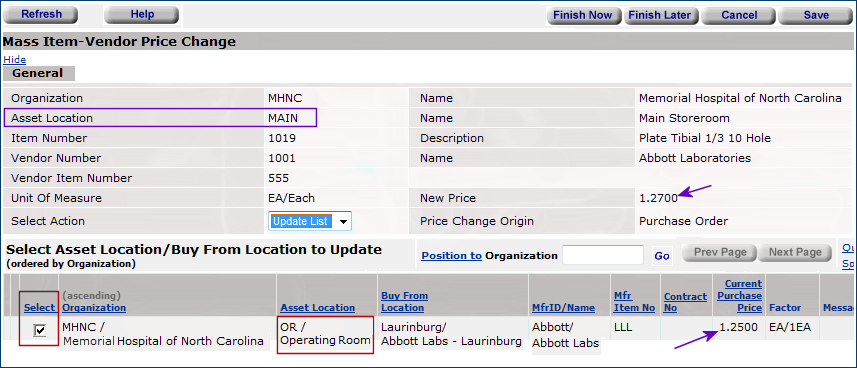
Figure 17 - Mass Item-Vendor Price Change Panel for Item in Figure 10
In Figure 17, the original price change was made in the item vendor record for asset location Main (top left, purple box). The price was changed from $1.25 EA to $1.27 EA (purple arrows). A multi-sourced item with the same vendor, VIN, and UOM also exists in asset location OR (red box, center). The user is copying the price change to the item vendor record in asset location OR.
To copy an item price change to item vendor records in other asset locations,
On the Mass Item-Vendor Price Change panel,
- Click the Select box next to one or more asset locations.
- Or, for all asset locations, in the Select Action field, click the down arrow and choose Select All.
- The system puts checks in the Select box(es).
Note: In the Select Action field:
- Choosing Unselect All removes the checks.
- Update List refreshes the list of asset locations.)
- Click Save.
- Click Finish Now to update prices (via a batch job). (After the price changes are applied, the batch job is deleted.)
- Clicking Cancel lets you delete the price change job.
- Clicking Finish Later saves the price changes for later review.
- To review price changes, you can access the Mass Item-Vendor Price Change panel from the Materials Management main Contents.
- Click Inventory > Mass Item Vendor Price Changes.
Assigning Default UOMs by Asset Location for Single Sourced Items
For single-sourced items, you can specify different default issue and default purchasing UOM settings, by asset location, for an item's primary supplier. If multiple purchasing or issuing units of measure are available for the supplier, you can set one of the UOMs as a new default for particular asset locations. (In an item spreadsheet, you will see single-source items designated *PUBLIC).
A new Item Inventory list menu option Override Default UOMs for Primary Supplier lets you choose different default issue and purchasing UOMs for the item for the asset location. The UOM can be selected from any of the Primary Supplier's existing UOMs for purchasing or issuing, as appropriate.
To assign an override default UOM
- From the Materials Management main Contents, select Inventory > Item Inventory (or Item Inventory - All Locations).
- The Item Inventory list appears.
- Locate the item of interest.
- Next to the item, click Menu > Override Default UOMs for Primary Supplier (Figure 18).
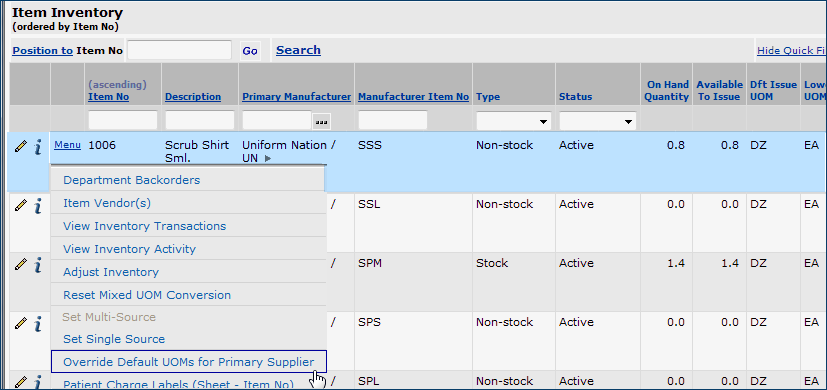
Figure 18 - Accessing Default UOM Overrides for an Item
- The Override Default UOMs for Primary Supplier panel appears (Figure 19).
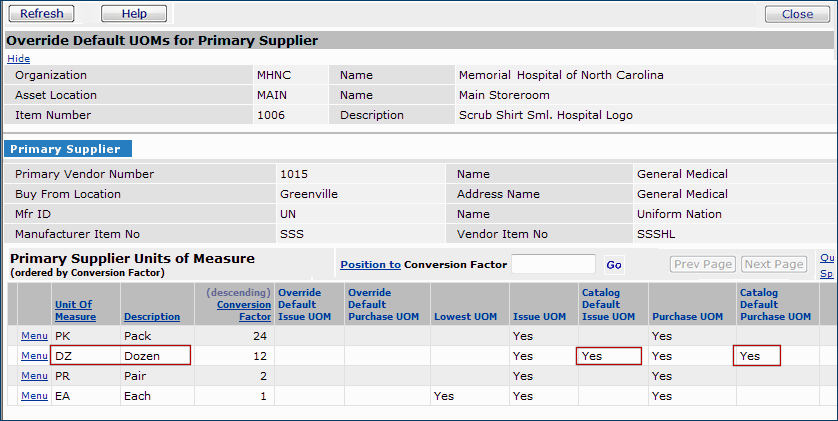
Figure 19 - The Override Default UOMs for Primary Supplier Panel
The top of the panel contains basic information about the asset location and item. The center of the panel -- "Primary Supplier" -- displays vendor information, including the primary vendor's ID, name, and buy-from location; the manufacturer, the MIN, and the VIN.
At the bottom of the panel under "Primary Supplier Units of Measure" are the UOMs available for the item from the primary supplier. In Figure 16 (red boxes), the current item catalog default UOM is DZ (dozen) for both issuing and purchasing. The other available UOMs are PK (pack), PR (pair), and EA (each). You could assign any of these other UOMs as the default for purchasing and/or issuing the item from the current inventory.
Suppose that you wish to change the default to purchase the item in packs (PK) and issue it in pairs (PR).
- Make the UOM changes as follows:
- Next to the UOM that you with to use as the issuing default, click Menu > Override to Default Issue (Figure 20).
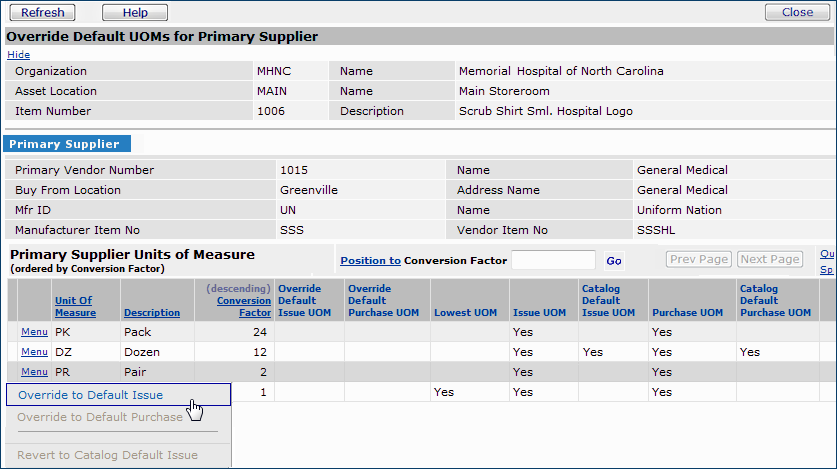
Figure 20 - Overriding the Default Issue UOM
- A confirmation panel appears (Figure 21).
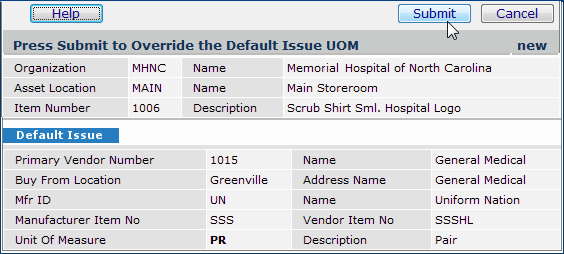
Figure 21 - Confirming a Default Issue Override UOM
- Click Submit.
- Next to the UOM that you wish to assign as the purchasing default, click Menu > Override to Default Purchase (Figure 22).
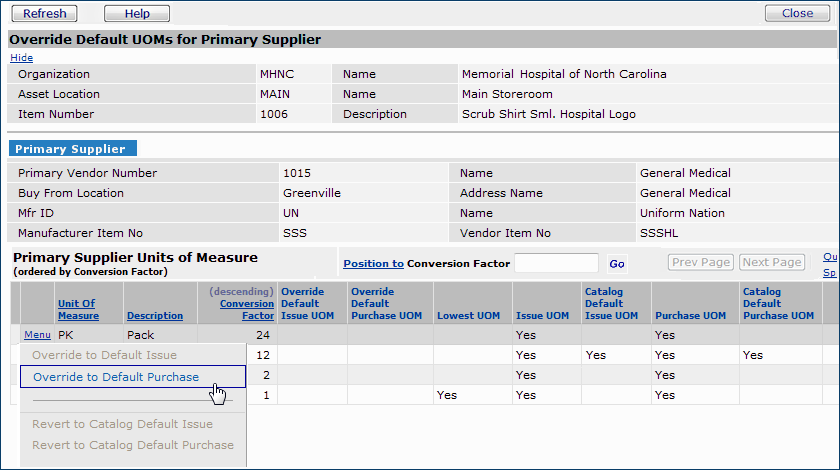
Figure 22 - Overriding the Default Purchase UOM
- The confirmation panel appears (similar to Figure 21).
- Click Submit. The Primary Supplier Units of Measure table changes to display the UOM overrides (Figure 23).
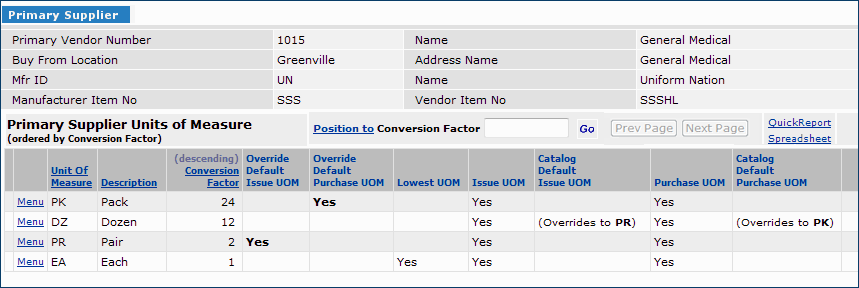
Figure 23 - The Primary Supplier Units of Measure Panel with Overrides Displayed
Notice that in both cases -- for issuing (Figure 20) and purchasing (Figure 22) -- if you set an override for the catalog default UOM, you can revert back to the catalog default UOM. The menu (Figure 20 and Figure 22) contains the selections Revert to Catalog Default Issue and Revert to Catalog Default Purchase, which are activated when you override a UOM.
- Click Revert to Catalog Default Issue and/or Revert to Catalog Default Purchase to revert to the catalog UOM.
- When you are finished selecting override UOMs, click Close to close the the Override Default UOMs for Primary Supplier panel.
Effect of Overriding the Catalog Default UOM(s) on Issuing and Purchasing Documents
When defined, the UOM issuing and purchasing overrides are used in place of the item's catalog default UOMs for these documents and features:
- Unapproved requisition lines (including transfers)
- Quick Issues
- Quick Credits
- Unauthorized purchase order lines
- Physical Inventories
- Departmental inventories
- Item prompts (i.e., the item list that appears selection after you click an Item No prompt)
- Unit of Measure prompts
- Par cart lines
- Order guide lines
- Inventory edits
- Inventory lists
- Item exports
-
the Response Formula
- Existing, unapproved requisition lines containing the catalog default issuing UOM are changed when the catalog default is overridden. The requisition lines display the new override issuing UOM.
- Similarly,
existing, unauthorized purchase order lines containing the catalog default purchasing UOM are changed when the catalog default is overridden. The PO lines display the new override purchasing UOM.
The UOMs for requisition lines and purchase order lines are only changed if the ordered quantity divides evenly by the conversion factor for the selected override UOM.
Effect of Overriding the Catalog Default UOM(s) on Reports
When UOM issuing and purchasing catalog default overrides are defined, they are displayed in these reports:
- Receipt History
- Inventory Transactions (for file and non-file Items)
- Item Inventory All Vendors
- Par Cart
- Order Guide
Changing Vendor Item Numbers and Manufacturer Item Numbers in Item Records
For multi-sourced items that are assigned to several asset location, you can change the Vendor Item Number (VIN) in one or several of the asset locations.
For a single item inventory, you can also change Mfr Item Numbers (MINs) and Manufacturer (MfrIDs) for items.
Copyright © 2023 by Premier Inc. All rights reserved.